 Acne.org Products
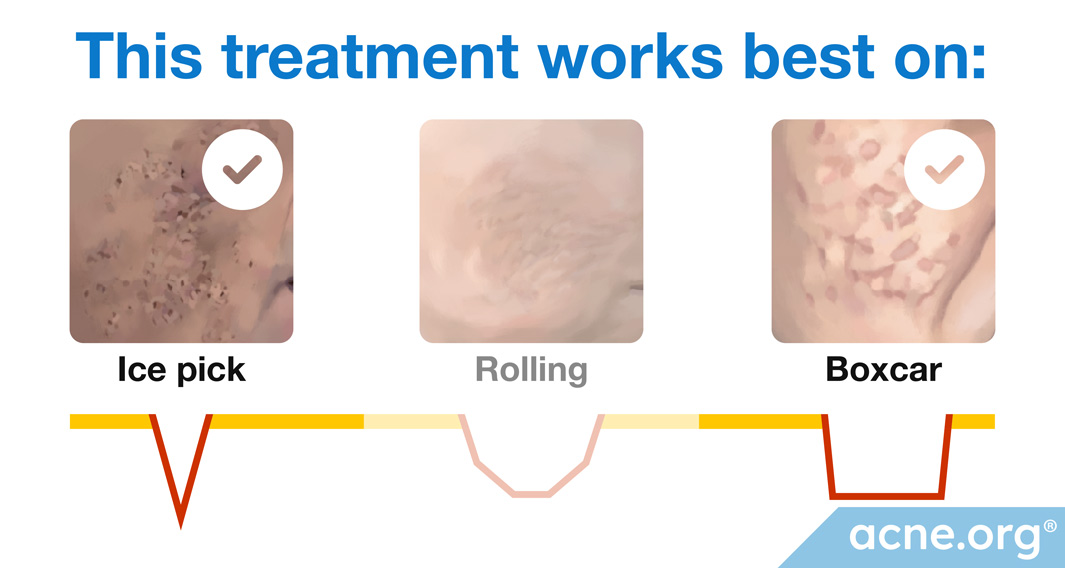
* Punch techniques work best on ice pick and smaller boxcar scars.
Punch techniques are procedures in which icepick and boxcar scars are cut out using a punch biopsy instrument (a tool that looks like a tiny apple corer). The doctor uses the biopsy instrument to remove one scar at a time, leaving behind a round hole. Punch techniques differ in what occurs after cutting out a scar:
- Punch excision: The doctor sews the edges of the wound together
- Punch grafting: The doctor places a graft (a piece of skin from another location, often behind the ear) in the wound and then stitches it up
- Punch elevation: The doctor cuts out the scar, but does not remove it: instead, she elevates the scar so that it is level with the surrounding skin and stitches it in place1,2
A single session can treat multiple scars, as long as the scars are at least 4-5 mm apart on the skin.2
For scars that are less than 4-5 mm apart, doctors recommend an interval of at least 4 weeks between sessions because of the risk of traction. Traction is the tension that results in the skin when the doctor sews up each wound, stretching the surrounding skin. If the scars are too close together, sewing up the wounds will create too much stretching of skin in a small area. Too much traction can impede healing and can even lead to the stitches opening up.2
Since punch techniques are invasive procedures, it is important to find a skilled doctor with extensive experience specifically in treating acne scars with punch techniques.
Like all scar revision treatments, punch techniques are sometimes combined with other scar revision treatments to achieve desired results.
People with active acne should not undergo acne scar repair of any kind, including punch techniques. Make sure your skin is clear of acne before you begin scar treatment.
Before agreeing to undergo punch techniques, consult multiple doctors about their opinions, proposed treatments, expected outcomes, and prices.
Procedure details:
Any punch technique procedure begins with these four steps:
- Marking the scars: The doctor uses a marker to indicate the scars to be treated.
- Cleaning the skin: The skin is cleaned with povidone iodine.
- Numbing the skin: The doctor injects the skin with a local anesthetic consisting of 1% lidocaine and epinephrine. About 10-15 minutes later, the skin becomes sufficiently numb and the blood vessels in the skin decrease in diameter, ensuring minimal bleeding during the procedure.2
After preparing the skin, each punch technique requires different steps.
In punch excision:

- Cutting out the scar: A punch biopsy instrument is used to cut into the skin around the scar down to the subcutaneous fat layer (the layer of fat underneath the deepest layer of the skin).
- For an icepick or small boxcar scar (smaller than 3 mm), the doctor uses a punch biopsy instrument with an equal or slightly greater diameter than the scar to make a round hole where the scar used to be.
- For a boxcar scar larger than 3 mm, the doctor uses a punch biopsy instrument to make an elliptical (oval-shaped) hole where the scar used to be. An elliptical wound will heal better and produce a cosmetically nicer result than a large round wound.
- Sewing up the wound: The edges of the wound are sutured (sewn together).
In punch grafting:
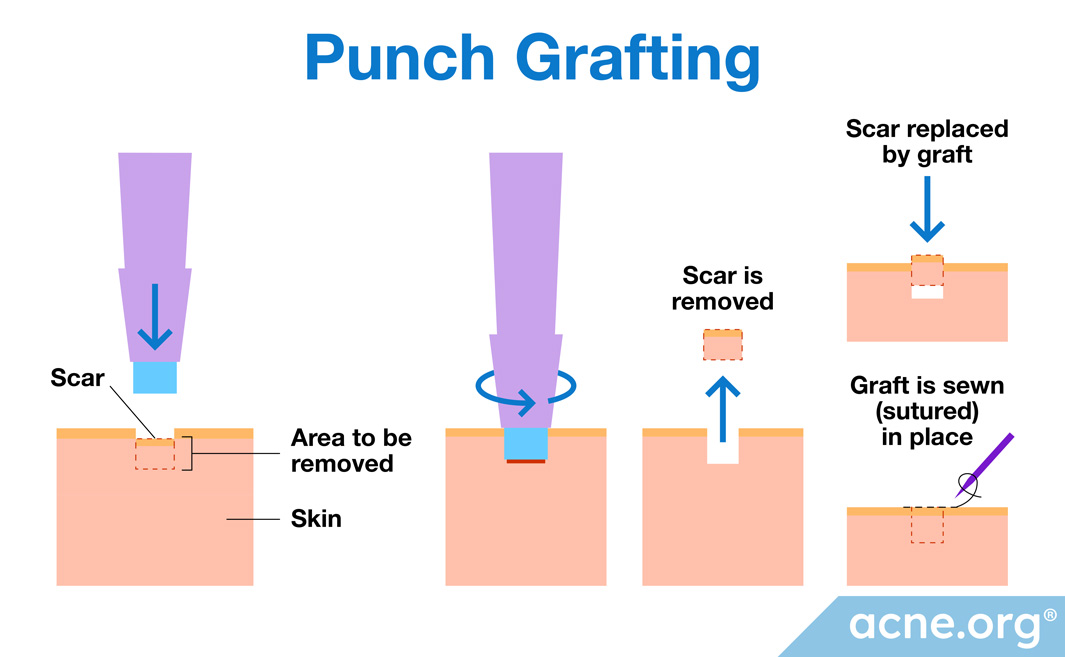
- Cutting out the scar: A punch biopsy instrument is used to cut into the skin around the scar and cut out the scar.
- Preparing the graft: A punch biopsy instrument is used to cut a circular graft (a piece of skin from another location). Often, the graft comes from the skin behind the ear.
- Grafting: The doctor replaces the scar with the graft.
- Sewing up the wound: The doctor sutures (sews) the grafted skin in place.1
Punch grafting tools (left) and results of removing skin in front of the ear (middle) and behind the ear (right) for grafts.
Unfortunately, the skin behind the ear often has a different thickness and color than the skin on the face, so punch grafting may result in unnatural-looking circles on the face. Because of this, doctors often recommend dermabrasion or laser treatment 4-6 weeks after punch grafting. These procedures remove the uppermost layers of the skin in the hope that when the skin regrows, it will be uniform in color and texture.2
In punch elevation:
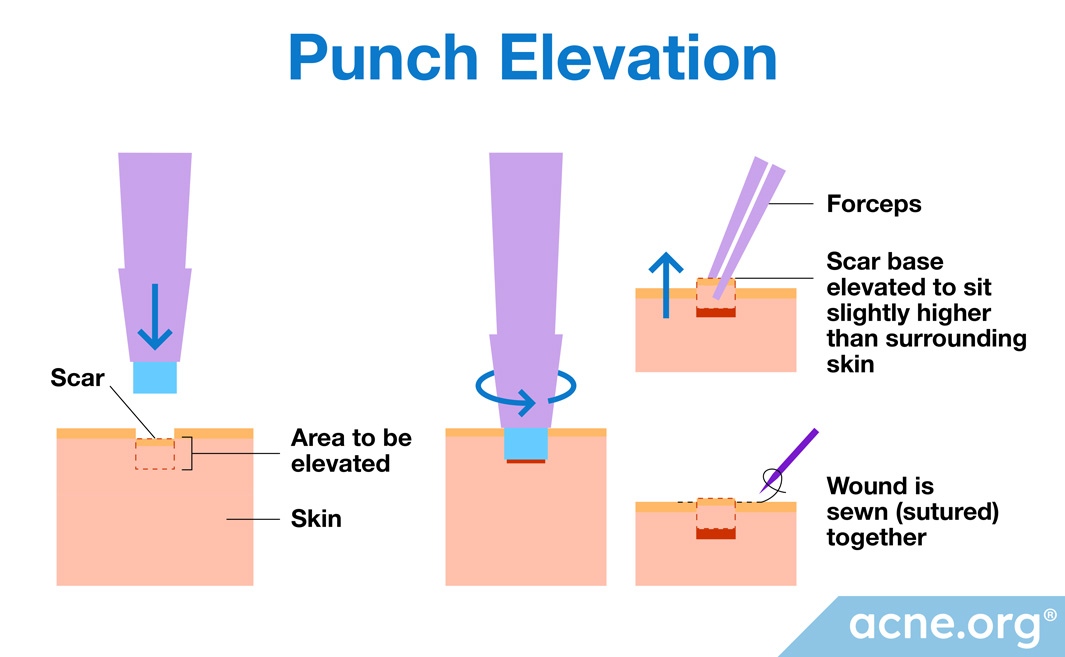
- Cutting out the scar: A punch biopsy instrument is used to cut into the skin around the scar and cut out the scar.
Punch elevation works best for boxcar scars, which have sharp edges and a base with normal skin (skin that is lower compared to the surrounding skin, but not made of scar tissue). With these types of scars, the doctor can use a punch biopsy instrument with the exact size of the inner surface of the scar to remove the scar. - Raising the scarred skin: The doctor raises the cut-out piece of skin so that it is slightly elevated above the surrounding skin. This ensures that when the skin contracts (tightens) during wound healing, the skin surface will end up being even.
- Sewing up the wound: The raised skin is sutured (sewn) in place.
All punch technique procedures end with these two steps:
- Applying an antibiotic cream: The doctor covers the treated skin with an antibiotic cream to prevent infections.
- Covering the wound with sterile dressings: The treated skin is covered with sterile bandages.
- Removing the stitches: After 7 days, the doctor removes the stitches to prevent the stitches from leaving a mark.2
Anesthesia:
Punch techniques require an injection of a local anesthetic.2
Before-and-after:
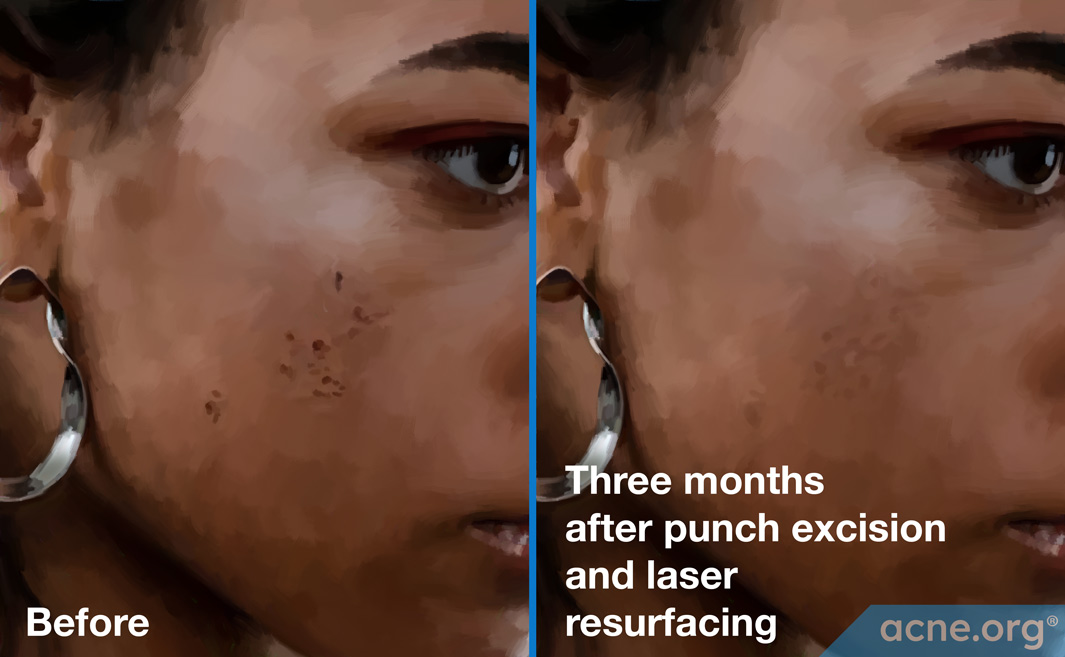
Acne scars before (left) and 3 months after (right) punch excision and laser skin resurfacing.
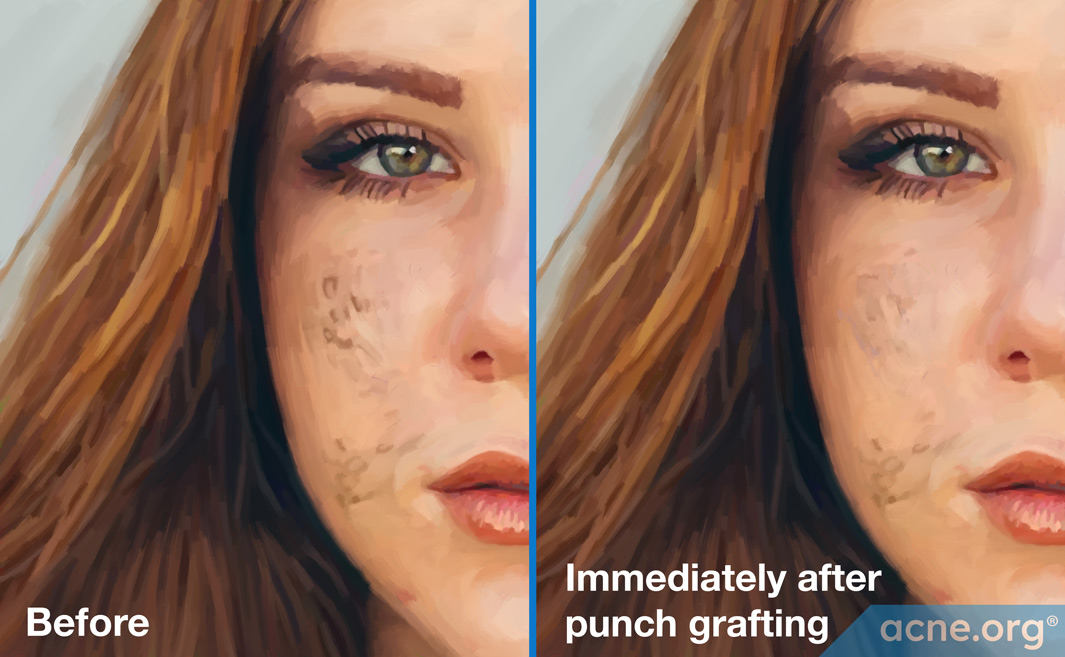
Acne scars before (left) and after (right) punch grafting.

Acne scars before (left) and 4 months after (right) punch elevation and fractional resurfacing.
References
- Levy LL, and Zeichner JA. Management of acne scarring, part II. A comparative review of non-laser-based, minimally invasive approaches. Am J Clin Dermatol. 13(5), 331-340 (2012).
- Jacob CI, Dover JS, and Kaminer MS. Acne scarring: a classification system and review of treatment options. J Am Acad Dermatol. 45(1),109-17 (2001).
- Faghihi G, et al. Efficacy of Punch Elevation Combined with Fractional Carbon Dioxide Laser Resurfacing in Facial Atrophic Acne Scarring: A Randomized Split-face Clinical Study. Indian J Dermatol. 60(5): 473–478, 2015.